Lighting Tutorial - Hati Chan
My youngest daughter decided that she can do mean Jackie Chan impression so I planned to capture her in the act and use the opportunity to share with you how to create a realistic sun or planet effect in camera, using simple equipment without resorting to Adobe Photoshop or other post-production.

As this an essentially low-key image i.e. dark, I needed to create a sense of depth in the frame. As it was dark outside I created a passable sun or planet using a Lastolite 20 inch white reflector/diffuser disc with a Speedlite behind transilluminating the white disc. I would have preferred some ambient light, but kids must do their homework before helping Dad with his daft ideas.
Hati was lit with a Speedlite modified with a honeycomb grid and Roscolux #302: Pale Bastard Amber gel to warm up her pale northern hemisphere winter skin tone. The shadow side of the shot was lifted with an Orbis Ring Flash.

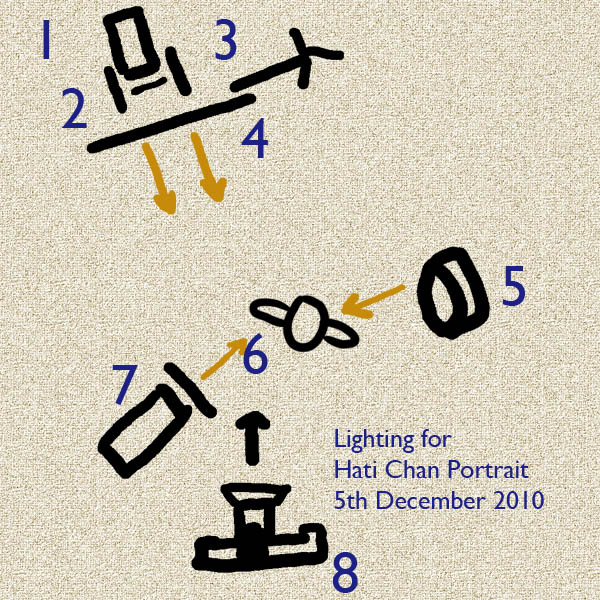
Key to lighting diagram:


As this an essentially low-key image i.e. dark, I needed to create a sense of depth in the frame. As it was dark outside I created a passable sun or planet using a Lastolite 20 inch white reflector/diffuser disc with a Speedlite behind transilluminating the white disc. I would have preferred some ambient light, but kids must do their homework before helping Dad with his daft ideas.
Hati was lit with a Speedlite modified with a honeycomb grid and Roscolux #302: Pale Bastard Amber gel to warm up her pale northern hemisphere winter skin tone. The shadow side of the shot was lifted with an Orbis Ring Flash.
Key to lighting diagram:
- Canon 550 EX Speedlite
- Rosco Photofoil rough edge snoot
- 2 x Rosco CTO
- 20" Lastolite collapsible reflector diffuser
- Orbis Ring flash
- Model
- Canon 580 EX II Speedlite with Rosco Pale Bastard Amber & 1/4 inch honeycomb grid
- Idiot with camera
Flash & camera settings:
- 1. 1/8 power
- 5. 1/32 power
- 7. 1/128 power. Yes 1/128 is correct as the flash was no more than 18 inches from the model!
- 8. f2.8, 1/40th second, 100 ISO, Daylight white balance
All flash were set to manual and triggered with the aid of a radio triggers.

Here is the translucent disc lit by 2 layers of CTO (aka Cinegel #3401: Roscosun 85) with a roughly cut piece of Rosco Cinegel #3809: Roscoscrim to reduce the intensity over part of the disc without diffusing and softening the light. At the top left of the disc you can see the shadow created by the rough snoot on the flash. This does not look very authentic when in focus...

With the focus adjusted to approximate to the previsulised shot the disc starts looking more authentic.

The key light only. The positioning of this this light is critical as the honeycomb grid creates a narrow beam of light with little spread.

The side fill light from the Orbis Ring Flash gives just a little detail right where it's needed.

The rear effect light, a little too much in focus and before post-production retouching to clean up a reflection from the bar supporting the Lastolite disc.

Here are all three lights working together. This is the shot as it came out of the camera, requiring little if any post-production adjustment. I have cleaned up the sun in the background and darkened the light line in the scarf on the models forehead, but that's it!

Can anyone share with other blog readers in the comments below what else I have done to this frame in post-production? No prizes, just the kudos of knowing you maybe right;-)
Happy snapping.
Ian


Comments
Post a Comment