Off Camera Flash - Canon EOS 7D
This article may also be downloaded as a PDF file.
I’ve been a avid user of off camera hotshoe and portable flash for a good many years, starting with a Vivitar 285 hotshoe flash and Metz 45 & 60 Series hammerhead flash units, all triggered by either Wein triggers or a mass of cables, multi-way adaptors and light sensitive triggers. Now, about the only time I use a flash on the hotshoe of a camera is at a press or PR call, and even then, I’d rather have the flash on a bracket beside the lens where it makes the camera more stable and the flash less prone to being knocked from the hotshoe and broken.
With the EOS 7D, Canon have introduced a whole range of new features including the ability to fire EX series hotshoe Speedlites remotely away from and off camera. This gives you the advantage of maintaining full E-TTL capability, whilst being able to adjust the flash power/output setting from the menu within the camera. As with the STE-2 Speedlite Transmitter you have 3 channels prevent misfires when working around other photographers.
In order to activate the EOS 7D in-built remote trigger you’ll need to make sure the pop-up flash is up as this is where the light transmitter is housed!
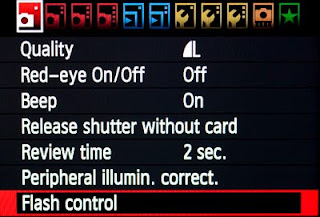 You’ll then need to go to the menu 1st red (left) > Flash Control at the bottom of the screen.
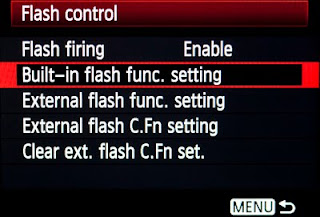 Next screen > Built-in flash func. setting.
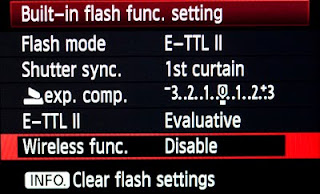 Next screen > Wireless func. press SET
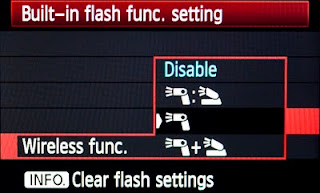
Next screen > Wireless func. and select the third item from the top, the lone flash icon. Press SET.
 The menu then returns to the previous screen where more options will become available. Each flash you’re working with is assigned a group A, B, or C allowing each Speedlite to be adjusted independently.
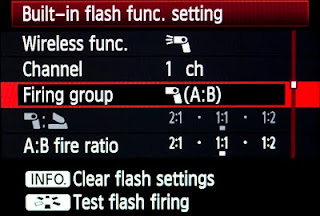 Select > Firing group(A:B) which will allow you to select the power ratio up and down between group A or B.
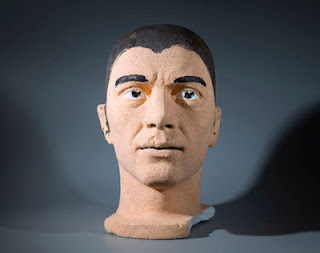
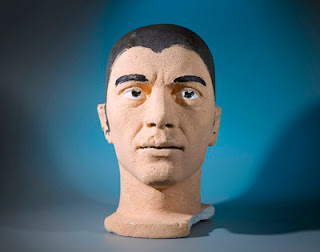
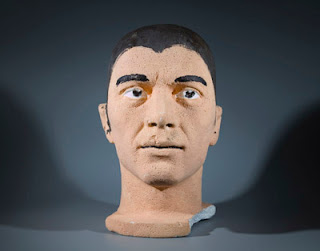 Meet Fred. Like his owner, Fred is a bit frayed around the edges. Here Fred is illuminated with two Canon 550 EX Speedlites (Groups A & B) spaced to either side with a third 580 EX II (snooted and blue gel*) on the background. Do remember that you’ll need to set each Speedlite to SLAVE and ensure that they are all on the same channel and that the Group is set to either A, B, or C. When positioning your Speedlites, do ensure that the red sensor window on the front is pointing toward the camera. This isn’t so important indoors where there may be surfaces which will bounce the control signal. Outdoors pointing the sensor at the camera is essential as distance and ambient light will degrade the signal. I’ve overcome this problem by using an off camera E-TTL lead with the ST-E2 wireless transmitter positioned closer to the flashes.
 Canon EOS 7D angles of acceptance and range
In the above shot you can see that Fred is evenly lit. By moving the thumb wheel on the camera back you can adjust the flash output up & down between the groups all without having to touch the Speedlites.
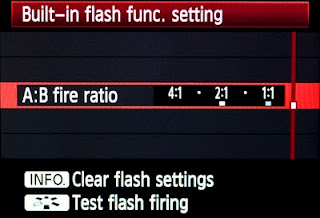
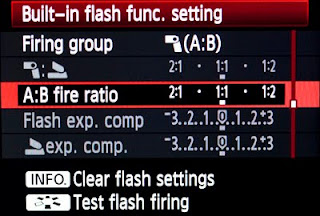 The ratio between the Speedlites is 1:1. This is simple to change. With the A:B fire ratio highlighted, press SET and use the thumbwheel to alter the ratio between the Speedlites. A ratio of 2:1 means that Speedlite A is one stop brighter than Speedlite B. 4:1 two stops brighter. Why Canon can't say +1 or +2 stops etc?
 The effect of a 2:1 ratio on Fred. You’ll notice that the left side of the image is now brighter than the right and the shadow from Speedlite B (to the right) has been lightened.
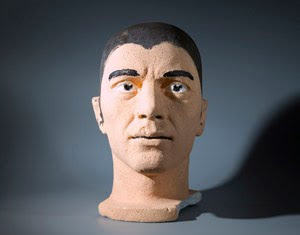 A:B 4:1 ratio. The shadow to the left is lighter and the left of the face appears lighter.
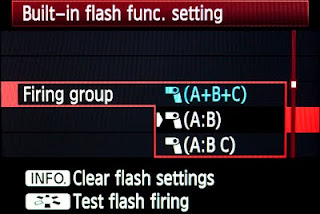
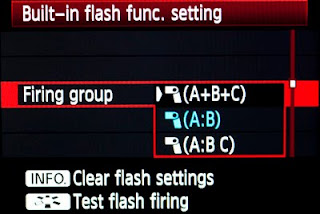 So far the Speedlite for the background (Group C) has been deactivated. By returning to > Built-in flash func. setting > Firing Group, you now have three options (A+B+C), A:B) & (A:B C). With the (A+B+C) option the camera will try and balance the scene using all three flashes.
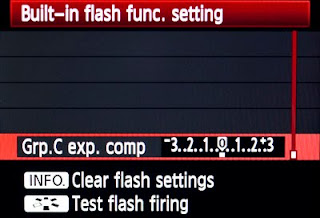 If you select the third option (A:B C) Speedlite C will be removed from the exposure calculation and adjusted independently for more creative background effects. To adjust Speedlite Group C you’ll need to go to Built-in flash func. setting > Grp. C exp.Comp where you can adjust the output up and down by 3 stops.
Conclusions
A great step forward for OCF (off camera flash) or Strobist style lighting fans. Obviously, this test is under controlled conditions in the confines of my studio. As soon as I’m able, I’ll conduct some tests in a larger interior and outdoors and publish my findings and images.
Remember
As with any new technique it’s best to practice, practice, practice, practice some more and record your results as you go along in a notebook or whatever for future reference. And if you’re lucky enough to have a model as even tempered as Fred, you won’t get too many complaints about how long you’re taking from the wife/partner/girlfriend/lover or kid and the usual “can you hurry up as I’m getting bored?”.
* Rosco Strobist Collection No. 375 Cerulean Blue
Camera Settings
If you like this article, forward this page to your friends and me and others know how you rate the article by leaving feedback in the comments section.
TTFN
Ian
Copyright © 2010 Ian Pack . Reproduction prohibited without prior written consent of the authors.
I’ve been a avid user of off camera hotshoe and portable flash for a good many years, starting with a Vivitar 285 hotshoe flash and Metz 45 & 60 Series hammerhead flash units, all triggered by either Wein triggers or a mass of cables, multi-way adaptors and light sensitive triggers. Now, about the only time I use a flash on the hotshoe of a camera is at a press or PR call, and even then, I’d rather have the flash on a bracket beside the lens where it makes the camera more stable and the flash less prone to being knocked from the hotshoe and broken.
With the EOS 7D, Canon have introduced a whole range of new features including the ability to fire EX series hotshoe Speedlites remotely away from and off camera. This gives you the advantage of maintaining full E-TTL capability, whilst being able to adjust the flash power/output setting from the menu within the camera. As with the STE-2 Speedlite Transmitter you have 3 channels prevent misfires when working around other photographers.
In order to activate the EOS 7D in-built remote trigger you’ll need to make sure the pop-up flash is up as this is where the light transmitter is housed!
 You’ll then need to go to the menu 1st red (left) > Flash Control at the bottom of the screen.
 Next screen > Built-in flash func. setting.
 Next screen > Wireless func. press SET
Next screen > Wireless func. and select the third item from the top, the lone flash icon. Press SET.
 The menu then returns to the previous screen where more options will become available. Each flash you’re working with is assigned a group A, B, or C allowing each Speedlite to be adjusted independently.
 Select > Firing group(A:B) which will allow you to select the power ratio up and down between group A or B.
 Meet Fred. Like his owner, Fred is a bit frayed around the edges. Here Fred is illuminated with two Canon 550 EX Speedlites (Groups A & B) spaced to either side with a third 580 EX II (snooted and blue gel*) on the background. Do remember that you’ll need to set each Speedlite to SLAVE and ensure that they are all on the same channel and that the Group is set to either A, B, or C. When positioning your Speedlites, do ensure that the red sensor window on the front is pointing toward the camera. This isn’t so important indoors where there may be surfaces which will bounce the control signal. Outdoors pointing the sensor at the camera is essential as distance and ambient light will degrade the signal. I’ve overcome this problem by using an off camera E-TTL lead with the ST-E2 wireless transmitter positioned closer to the flashes.
 Canon EOS 7D angles of acceptance and range
In the above shot you can see that Fred is evenly lit. By moving the thumb wheel on the camera back you can adjust the flash output up & down between the groups all without having to touch the Speedlites.
 The ratio between the Speedlites is 1:1. This is simple to change. With the A:B fire ratio highlighted, press SET and use the thumbwheel to alter the ratio between the Speedlites. A ratio of 2:1 means that Speedlite A is one stop brighter than Speedlite B. 4:1 two stops brighter. Why Canon can't say +1 or +2 stops etc?
 The effect of a 2:1 ratio on Fred. You’ll notice that the left side of the image is now brighter than the right and the shadow from Speedlite B (to the right) has been lightened.
 A:B 4:1 ratio. The shadow to the left is lighter and the left of the face appears lighter.
 So far the Speedlite for the background (Group C) has been deactivated. By returning to > Built-in flash func. setting > Firing Group, you now have three options (A+B+C), A:B) & (A:B C). With the (A+B+C) option the camera will try and balance the scene using all three flashes.
 If you select the third option (A:B C) Speedlite C will be removed from the exposure calculation and adjusted independently for more creative background effects. To adjust Speedlite Group C you’ll need to go to Built-in flash func. setting > Grp. C exp.Comp where you can adjust the output up and down by 3 stops.
Conclusions
A great step forward for OCF (off camera flash) or Strobist style lighting fans. Obviously, this test is under controlled conditions in the confines of my studio. As soon as I’m able, I’ll conduct some tests in a larger interior and outdoors and publish my findings and images.
Remember
As with any new technique it’s best to practice, practice, practice, practice some more and record your results as you go along in a notebook or whatever for future reference. And if you’re lucky enough to have a model as even tempered as Fred, you won’t get too many complaints about how long you’re taking from the wife/partner/girlfriend/lover or kid and the usual “can you hurry up as I’m getting bored?”.
* Rosco Strobist Collection No. 375 Cerulean Blue
Camera Settings
- Camera: Canon EOS 7D
- Lens: Canon 24 - 105 mm f4 IS L Series
- Lens focal length: 50 mm (80 mm on APS-C Sensor)
- Aperture: f8
- Shutter: 1/125th
- ISO: 100
- White balance: Daylight (5250K)
- File recording: RAW/jpeg ( 5184 x 3456 pixels)
If you like this article, forward this page to your friends and me and others know how you rate the article by leaving feedback in the comments section.
TTFN
Ian
Copyright © 2010 Ian Pack . Reproduction prohibited without prior written consent of the authors.


Comments
Post a Comment