Converting a Digital Colour Photo into Black and White
A tutorial for Adobe Photoshop™ CS2, 3 or 4
Skill Level: Beginner to Intermediate
This tutorial may also be downloaded as a PDF file.
There are any number of ways in Adobe Photoshop to convert an image to black & white, and just about everyone will tell that their way is best! I not saying that the following way is the best, but it suits the way Ben & I work at the studio. It’s quick and retains the image colour information so that you can print your images through a conventional mini lab or kiosk or even prepare an image for a digital or offset litho press.
How not to do it!
Most people when they start converting images to monochrome or black & white make the mistake of throwing away the important colour information by either using the camera black and white function or by converting to grayscale in Adobe Photoshop or whatever imaging post-production software they use. Don’t do it. Remember that if you shoot in black & white or convert to grayscale you only have a black & white image. And, if you try printing a grayscale image through an RGB printer, who knows what will happen to the image? You’ll more than likely get a colour shift you don’t want.
The Pack Shots Method
Go to the layer palette crtl/cmd F7, at the bottom of the palette select the circular black & white icon. This time select Curves. You’ll need to create a shallow S type curve by clicking and dragging the points at the bottom (shadows), middle (mid tones) and top (highlights). No one curve will suit all images so don’t be affraid to play with the curve until you get a result that you’re happy with.
Once you get the hang of this technique, you’ll be able to create black and white images in minutes - literally.
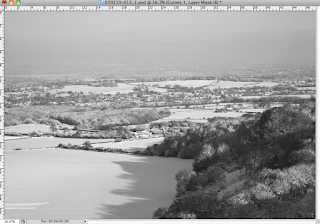 The finished black & white image. All you need to do for printing is crop and resize to the required size.
You can add a simple coloured tint to the image by adding a Colour Balance adjustment layer. Go to the layer palette crtl/cmd F7, open the Adjustment layers menu & select Colour Balance.
 Move the top slider 10 points to the right and the bottom slider 10 points to the left, giving a subtle sepia brown effect.
 The finished image with the sepia tint applied.
As this is a snow scene maybe a cooler tint would be more appropriate! Move the top slider to the left 10 points and the bottom slider to the right 10 points to give a cooler effect. Don’t be afraid to experiment, it’s a great way to learn.
QUICK TIP
When preparing a file for printing by a mini lab or kiosk, unless told otherwise, resize your image to the desired print size (i.e. 10” x 8” etc). That way you control the cropping. Differing print sizes will crop your images differently. Save the file using Adobe RGB 1998 colour space, at 300 dpi and Save As a JPEG file at level 9 or 10. Doing this increases the probabilty of getting a print looking the way you want it and makes life easier for the lab manager!
This tutorial may also be downloaded as a PDF file.
Skill Level: Beginner to Intermediate
This tutorial may also be downloaded as a PDF file.
There are any number of ways in Adobe Photoshop to convert an image to black & white, and just about everyone will tell that their way is best! I not saying that the following way is the best, but it suits the way Ben & I work at the studio. It’s quick and retains the image colour information so that you can print your images through a conventional mini lab or kiosk or even prepare an image for a digital or offset litho press.
How not to do it!
Most people when they start converting images to monochrome or black & white make the mistake of throwing away the important colour information by either using the camera black and white function or by converting to grayscale in Adobe Photoshop or whatever imaging post-production software they use. Don’t do it. Remember that if you shoot in black & white or convert to grayscale you only have a black & white image. And, if you try printing a grayscale image through an RGB printer, who knows what will happen to the image? You’ll more than likely get a colour shift you don’t want.
The Pack Shots Method
Open your image. Go to the layer palette crtl/cmd F7, at the bottom of the palette select the circular black & white icon. This will open the adjustment layers menu. Select Hue/Saturation. A new dialogue will open with three sliders. Move the middle slider all the way to the left - this gives you the black white effect.
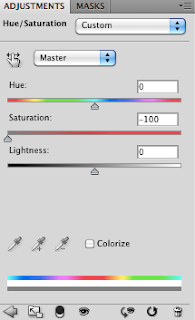 Hue/Saturation palette with the middle (Saturation) slider to the left, making the black & white image.
At this stage the image will look a little flat and will need contrast adding. To do this we add a Curve adjustment layer. Hue/Saturation palette with the middle (Saturation) slider to the left, making the black & white image.
Go to the layer palette crtl/cmd F7, at the bottom of the palette select the circular black & white icon. This time select Curves. You’ll need to create a shallow S type curve by clicking and dragging the points at the bottom (shadows), middle (mid tones) and top (highlights). No one curve will suit all images so don’t be affraid to play with the curve until you get a result that you’re happy with.
Once you get the hang of this technique, you’ll be able to create black and white images in minutes - literally.
 The finished black & white image. All you need to do for printing is crop and resize to the required size.
 You can add a simple coloured tint to the image by adding a Colour Balance adjustment layer. Go to the layer palette crtl/cmd F7, open the Adjustment layers menu & select Colour Balance.
 Move the top slider 10 points to the right and the bottom slider 10 points to the left, giving a subtle sepia brown effect.
 The finished image with the sepia tint applied.
QUICK TIP
When preparing a file for printing by a mini lab or kiosk, unless told otherwise, resize your image to the desired print size (i.e. 10” x 8” etc). That way you control the cropping. Differing print sizes will crop your images differently. Save the file using Adobe RGB 1998 colour space, at 300 dpi and Save As a JPEG file at level 9 or 10. Doing this increases the probabilty of getting a print looking the way you want it and makes life easier for the lab manager!
This tutorial may also be downloaded as a PDF file.


Comments
Post a Comment